Search This Blog

Thursday, 24 March 2022

Mothering Sunday

Mothering Sunday. That's what it used to be called. Now more commonly referred to as 'Mother's Day'. For the sake of Brenda (our fabulous play group tea lady), who prefers the old name, to the new, I have adapted this popular tea pot craft with a ditty that reflects the traditional name for this day.


In the UK, Mothering Sunday, is on the fourth Sunday of Lent. In the past, it was considered important for people to visit their 'Mother Church' the main church in their area. This of course, brought families together for the day, as domestic servants were allowed to return to their home church. Thus it has become associated with the idea of visiting home and taking a gift of flowers to your Mother.


Teapot worksheet


Equipment

  • coloured card
  • worksheet
  • scissors
  • single packet tea bags
  • flower stickers
  • pens 


Preparation:

1. Photocopy worksheet onto card.

2. Cut out teapot shape and round the top of the heart (enough to insert tea bag packet).


Method:

1. Children decorate teapot with stickers.

2. Help children select tea bag and insert into teapot.

3. Write child's name on the back and leave on the 'Home' table to be collected at the end.


NB Feel free to print/enlarge my image for non-commerical use. If you would prefer a more personalised teapot, with a finger print design, you might like to try this one: https://www.messylittlemonster.com/2015/04/teapot-craft-free-printable.html

Tuesday, 18 January 2022

Happy New Year! Calendar Craft


Happy New Year!

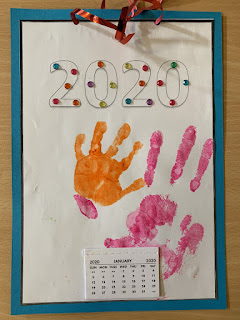
We always start the new year with a calendar craft and ever since I discovered how much our Mums love a hand print of their child, to keep for posterity, its been a hand print. Sometimes (as this year) accompanied by a poem, always with the date, though, so that, years later, they can place that moment in time.

This is this year's version ('scuse the shadow, it was a busy old morning, so I had to take the pic as quickly as I could, before the moment was gone).


And if you'd like to see the blank version, it's here:

This is the version we did two years ago, just before the pandemic struck!


As you can see, each one is unique! Just as it should be!


Equipment:

  • coloured photocopy card
  • curling ribbon/scissors
  • hole punch
  • calendars
  • stapler (to attach calendars)
  • poster paint/paint trays (we use 3 or 4 colours)
  • sponges (for applying paint to hands)
  • stickers
  • wipes
  • overalls
  • pens (to label craft work)

Preparation:

1. Order calendars (before Christmas). You can get them from places like *Baker Ross and Amazon. Some local stationers may also stock them.

2. Prepare sheet for craft and photocopy onto coloured card (or onto plain paper, trim and stick onto card).

3. Hole punch holes in the top of the card for a ribbon to hang it.

4. Cut ribbon for hanging calendar.


Method:

1. Help children roll up sleeves and put on overall.

2. Show children how to apply paint to their hands (it comes out less splodgy when applied with a sponge) and then press hand on to paper.

3. Wipe hands with wet wipe. Give children option to try another colour.

4. Allow children to embellish with stickers.

5. Give children option of ribbon to hang calendar.

6. Adult to attach calendar with stapler.

7. Ensure children's name is on work, and put aside to dry, ready for Home time.


*Any resources listed purely for information purposes only.


Thursday, 2 December 2021

Christmas Tree Crowns

Christmas is upon us, once again!

Every other year, the Church holds a Christmas Tree Festival and our toddler group always enters a tree.

This year, our tree's focus is based around the concept of the potential of each baby. 

In Jesus' case he was born to be kind, albeit not an earthly one. So this year, we made clay crowns, like these:

What child can resist a bit of bling, eh?


Equipment:

  • Air drying clay* 
  • Rolling pin
  • Crown cookie cutter
  • Drinking straw
  • Paper
  • Pen (for writing names)
  • Paint brushes
  • Gold paint
  • Pot for paint
  • Glittery bits (beads, sequins, gems)
  • PVA glue
  • Glue brush
  • Glue pot
  • Newspaper
  • Overalls
  • Baby wipes
  • Scissors
  • String or ribbon for hanging

Preparation:

1. Prepare pots of paint.

2. Roll out balls of clay. You could roll these out in advance, and keep sealed, but I did this on the day, as fresh clay is more pleasurable  and easier to use. I do this for them, as clay needs to be rolled evenly, and that can be hard for children to manage. If it is too thin, it will be more fragile, once dry.

3. Roll out clay (on sheet of paper) and cut out crown shapes. Remove excess clay from around cutter, before pulling cutter away. I roll out on a sheet of paper, which may sound wasteful, but sops clay from sticking to the table and makes it easy to transfer clay work away, once it is finished.

4. Make hole for hanging. The end of a drinking straw is ideal for this. If you do it in advance, the children will work around it, if you try to do it at the end, there may not be much space! 😄


I only roll out enough for one table, at first, as I don't want the clay to dry out.


Method:

1. Child paints crown gold. Yes it is on damp clay, but they will dry together. The paint will be a little thin, but using white clay means it will be fine.

2. Child adds glittery bits, by pressing them in firmly. It does not matter where they place them, or how many they use, the end effect will still be stunning.

3. Write child's name on sheet and remove to dry. This may take a day or two, depending on where you place it. 

4. When the crown is dry, paint it with PVA, across all the crown and round the edges, but not underneath. Try to keep the ole for hanging clear of glue.

5. Leave to dry (approx. 6 hours, depending on how thick your glue is).

6. Cut string or ribbon to desired length, ready to hang your ornament.


I balanced the clay crowns on small pots, whilst painting the PVA and leaving it to dry, so the edges didn't stick to the newspaper.


The completed tree!


*Resources:

Das Clay  (we use this one - widely available Hobbycraft, The Works, W
HSmith etc.)

Giotto gold paint (also available at The Range, I think)

Crown cookie cutter

Gold string for hanging (similar in Sainsbury's)

Please note: no Ads here. Resources listed, purely to help people find similar.

Friday, 15 October 2021

Camel Mask

Continuing with the theme of 'Stories Jesus told' (based on the parables of Jesus) this week we focused on the parable about fitting a camel through the eye of a needle.

In order to illustrate the story, we had a leader dressed as a camel and loaded up with baggage, trying to squeeze under a craft table. Let's just say you had to be there!

It seems like a ridiculous notion, but the story emphasizes the idea that what looks impossible to us, is possible with God. Jesus used the story to make a point about how the desire for possessions makes it incredibly difficult for a rich man to enter the Kingdom of God. 

However, I love the explanation in this article, that points us towards the grace of God, in making that possible. However, it could also illustrate that Jesus welcomes us to come to Him just as we are. No amount (or even lack) of possessions should be a bar.

Like the sheep mask craft, I can see the potential here to make use of the masks as a prop for Nativity reenactments.

The masks we made were based around the mask template you can find here. I made mine slightly larger. They were photocopied onto card. You can find the fuller explanation below.


You can just about see the yellow card strip headband, if you look carefully!


Equipment

Overalls

Brown poster paint

Plastic trays for paint

Sponges

Photocopied masks 

Card strips

Scissors

Stapler

Googly eyes

PVA glue/spreaders

Baby wipes


Preparation

1. Photocopy mask onto card and cut out.

2. Cut card strips to appropriate size.

3. Mix paint.

4. Prepare glue pots.


Method

1. Overalls on, sleeves rolled up.

2. Show child how to use sponge to apply paint to camel.

3. Glue on googly eyes.

4. Fit card strip to child's head, using stapler to fasten ends.

5. Fasten mask to card strip.

6. Label and leave to dry.


Similar activity

Sheep Mask

Friday, 8 October 2021

The Precious Pearl

We all need to know we're special, important, valued. 

This week's craft reminds us of just that. It's based around the story that Jesus told about a very special pearl of such great beauty, that a merchant was prepared to give up everything he had, just to own it. We used the version retold by Mick Inkpen (see here, not an affiliated link, you can buy it other places also).

Traditionally this parable has been taught the other way around; that God is the pearl of greatest price and we must give up everything for Him. However, having heard John Wimber's interpretation; that God gave up everything for us, I can't shake it off. So that's the angle I went for with this. We are special, we are loved. And in this day and age, where it's too easy to compare ourselves unfavourably by comparison with others, we need to hear that message more than ever.

Here's the craft. Very simple, because our kids this year seem younger than ever and need the very basics. This became evident when we did the craft, as only this one had what I would call 'legible' hand prints! The kids just got their hands in the paint and went mad. But why not? It's all good sensory experiential learning! And I can remember my daughter doing the very same at that age! 😆


Equipment:

Floor covering
Overalls
Baby wipes/bowl of water & disposable hand towels
Poster Paint
Paper Plates (paint pallettes)
Photocopy sheet


Preparation:

cover floor with heavy plastic sheeting
photocopy sheet with heart onto A3
paper plates (paint palettes) with blobs of paint
lay out overalls
get bowl of soapy water ready


Method:

1. Demonstrate to child how to apply paint to hand and hand to paper.

2. Let chaos ensue.

3. Clean up and leave artwork to dry on the 'Home' table.


Oh and here's the sheet I used!


Songs to accompany this craft?


I know Jesus Loves me (Ishmael)
God Love you and I love you and that's the way it should be (Anon)
123, Jesus loves me (Anon)

Sheep Mask

We're back! The toddler group is up and running and this term, we've based on our theme on 'Stories that Jesus Told' (aka the parables). Whether you consider yourself religious or not, there are some great stories right there, with lost of lessons to each us all.

We've been using a great little book which retells the stories in an accessible way, by Mick Inkpen. See here (not an affiliated link, there are other places you can buy it).

A perennial favourite is the parable of 'The Lost Sheep'. Having done easy, peasy sheep crafts to death (or so I thought), I decided the time was right for a sheep mask/headband craft. Headbands are actually probably more comfortable for most kids to wear and save on the job of getting the holes in the right place, without jabbing someone directly in the eye.

I've made it easy for myself, by making it a one page photocopy page. The headband bit can quickly be guillotined off, and for the most part, the rest is fairly straightforward to cut out, and if, like us, you have less people in at the moment, its not too arduous a task, if you're sat watching telly of an evening.


Feel free to use, but please retain attribution.


Equipment:

Headband sheet photocopied onto card

Scissors

Cotton wool balls

PVA glue, pots and glue spreaders or lollysticks

Large googly eyes

Stapler

Baby wipes (for cleaning up)


Preparation:

1. Photocopy sheet.

2. Cut out shapes.

3. Prepare glue pots (Playdoh pots work well, because you can seal them with their lids).


Method:

1. Show/guide child in adding cotton wool balls and googly eyes.

2. Join headband parts together, using shaded areas.

3. Wrap head band round child's head to size, mark length required.

4. Remove headband from child, staple headband together, Trim excess card and leave to dry.


 Oh yes!! And did I mention that it could also make a great prop for a Nativity, later in the year? 

And in the meantime, why not use it as a prop for singing. 'Baa baa black sheep,' anyone?


Other useful posts:

Sheep craft collage

Sheep craft printing

Tuesday, 30 June 2020

Paper Plate Chickens

Not so long ago, the Queen gave a great message about how Easter isn't cancelled, just because of the Coronavirus lockdown. In the same way, neither is Spring, or, for that matter, Summer!

Blossom is bursting out, and whether we can see it or not, young animals are being born.

So, today I thought I'd share our chicken craft, that we did this time last year.

You can accompany this craft with Dora's Chicks, if you have access to the book, or you and your child could have great fun, singing, 'Chick, Chick, Chick, Chick, Chicken lay a little egg for me!'


Spot the missing feature!


Equipment:

  • Paper plates
  • Googly Eyes
  • Feathers
  • Red Cardboard to cut out wattles and combs
  • Yellow card for beaks
  • PVA glue & glue spreaders
  • Scissors

Preparation:

Cut out some Wattles and Combs for your paper plate chickens, from red (or maybe even pink) card.
Cut beaks from yellow card.
Gather some pictures of chickens for the children to look at.


Method:

1. Fold Paper plate in half.

2. Assist children to look carefully at the chicken pictures and think about where to place, eyes, wattles, combs and beaks. You may end up with all kinds of variations, including multiple eyes, but I tend to let that go, as art and craft should really be about allowing the children the opportunity to express themselves. It can also be a great way to assess their understanding.

3. Attach feathers, as desired, using PVA glue.


Friday, 10 April 2020

Easter Gardens

Let me just stress, this isn't something we've tried at toddler group... yet!

However, I think this is a great activity to try out at home with young children and could be a great starting point for discussing the story of Easter.


This one was made by my daughter.

The great thing is, that this garden was made completely with things we already had at home, or found on a walk.


Equipment:


  • Tray or pot of some kind (small or as big as you like)
  • Small flower pot (this one came from a pile that I have amassed)
  • Stones/gravel
  • One large stone to cover the mouth of your flower pot
  • Moss
  • Twigs
  • String
  • Scissors
  • Embellishment (this can be natural or man made)
  • Soil/compost


Method:

1.  Choose a tray or pot for your base. You may have an old flowerpot or seed tray hanging round in the garden, but you could also use a tray from a ready meal, if it's been washed out.

2.  Fill the pot with soil or compost.

3.  Take a small plant pot and half submerge it in the soil/compost, to create a little cave tomb.

4.  Use some stones to create a little pathway to the pot/tomb. My daughter added a little sand to hers.

5.  Place clumps of moss around the tomb, to look like grass. 

6. Use string, to join two twigs to make a cross shape and place it in the soil above the 'tomb'.

7. Embellish your scene with small plants/plant material. We used some man made flowers.

8. Find a big stone/pebble to place beside the mouth of your pot, to be the stone that was rolled away.

9. Find a spot to place your little Easter garden, where it can be enjoyed. Don't forget to keep it watered, to keep it looking fresh!


Easter Nests

Strictly speaking this is not of course a craft, but hey, it's Easter and making these must surely be a young child's rite of passage. 

Anyway, it's such an easy recipe, and involves chocolate, and who can resist that?


Yum! Yum!

Equipment:


  • Baking tray
  • Muffin cases*
  • Silicone spatula
  • Saucepan
  • Mixing bowl
  • Hob

*The original recipe calls for 10 paper cases. I use 12, as although it's nice to have great chunky cakes, I think a little goes a long way, especially with little ones! If you'd like yours to be bigger, I'd suggest using one and a half times the amounts given above, except for the pack of Mini Eggs.


Ingredients:

225 g  Chocolate

50 g  Margarine/Butter

2 tbs  Golden Syrup

100 g  Cornflakes

1 pack Mini Eggs


Safety Notes:

1. If doing this with young children, you may wish to do the heating and stirring part yourself. If you allow children of any age, please supervise carefully. Obviously you want to avoid the children being burnt by the pan as it heats up and once it's been taken off the heat and also be aware of the danger of catching hair/clothing on the flames.

2. With younger children, you may want to halve the mini eggs, lengthways (as we do with grapes at toddler group), to reduce the chance of choking. However, take care, as Mini Eggs shells are brittle and quite tricky to halve with a sharp knife!


Method:

1. Place the muffin cases in a baking tray. 

2. Place the chocolate, margarine and golden syrup in the saucepan. Gently heat the mixture, stirring the ingredients with the spatula as they melt. 

3. Place the cornflakes into a mixing bowl and add the mixture from the saucepan. Mix together, thoroughly.

4. Spoon the mixture into the paper cases. 

5. Make a little well in each little blob of mixture, to form the 'nest' shape.

6. Place 3 mini eggs in each 'nest'. 

7. Place in the fridge to allow the chocolate to harden.


Recipe taken from Topmarks


Sunday, 15 March 2020

Incy Wincy Spider

There can't be a playgroup in the land who has never sang Incy Wincy Spider

This Song is certainly a favourite of ours, and surely quite topical, with the the wet weather we've been having this year.

We've made various versions of Incy in the last four or five years, but I think this one is my favourite!


Each one is unique!


Equipment:


  • Play dough 
  • Googly eyes
  • Pipe cleaners
  • Paper plates/small pieces of card
  • Felt pens


Preparation:

  • Cut pipe cleaners in half and then in half again.


Method:

1. Take a small lump of play dough and roll into a ball.

2. Add two googly eyes. We provided a few different sizes, to choose from.

3. Add pipe cleaners as legs. Children may decide to add as few or as many as they like, but that is totally fine!

4. Place on paper plate/card and write name on the side, ready for home time.


* We used the Kids with Food Allergies rice flour recipe, so that it would be suitable for anyone allergic to wheat/gluten. We used black food colouring, to make the spider, but actually your spiders could be quite colourful, if you like! Play dough can be made a few days in advance but will need to be stored in the fridge in a air tight container.

Springtime Daffodils

One activity that always goes down well at playgroup is planting. Usually we'd plant seeds, but this activity coincided with St Patrick's Day, so we decided to opt for daffodils. 

All very well and good, but bulbs actually need planting in November, so we cheated and bought some that were ready sprouted, for the children to plant in their pots!


All potted up!

The question was, what song to sing? Not knowing any St Patrick Day songs, Mary Mary, Quite Contrary, seems a good choice to me!


Equipment:

  • Pots of young daffodils (we got ours at Asda*)
  • Tuff builder's tray
  • Compost
  • Plastic trug
  • Small trowel/large spoon
  • Paper cups (we bought a selction of coloured cups from Baker Ross*)
  • Stickers
  • Felt Pens
  • Washing up bowl with soapy water (for hand washing)
  • Towel


Preparation:


  • Buy daffodil pots & compost. Open the compost bag and empty into plastic trug.
  • Lay out planting equipment on Tuff tray. It makes a good base that will contain some of the mess.


Ready for action

Method:

1. Decorate paper cup with stickers & felt pens.

2. Fill pot halfway with compost.

3. Place bulb in pot.

4. Add more compost around the bulb and press down firmly.

5. Wash hands thoroughly, to make sure all the compost is cleaned off.


*Any indication of where we sourced products is just to help you find suitable products and materials. We are not affiliated to any companies. We do not profit by mentioning them..

Marching Drums

One of the songs our littlies love to sing at playgroup is The Grand Old Duke of York. So it seems only natural to make our own drums, with which to sing along!


Ready to march!

If you need a reminder, the words of the song can be found by following this link.


Equipment:

  • Used container with lid
  • Coloured paper circles
  • Felt pens
  • Stickers - we ordered some instrument stickers from Baker Ross*
  • PVA glue and spreaders
  • Plasticine
  • Short sticks
Not that attractive in its original state, you can see why it needed covering!

Preparation:
  • Collect suitable tubs/containers.
  • Cut coloured paper/light card circles for the top of the tub. You could also do as I did, and cut card to fit the side of the tub, or if you're feeling brave you could use poster paint mixed with PVA glue.

Method:

1. Use PVA glue to stick coloured paper on the tub, to prepare the surface for decoration.OR paint decoration using paint mixed as above.

2. Decorate coloured paper using felt pens & stickers.

3. Roll a ball of plasticine and mould it round the end of a short stick, to form a drumstick.

4. Don't forget to try them out at song time! The children are sure to enjoy marching round with their drums!


*We sourced ours from Baker Ross. We are not affiliated to Baker Ross in any way. We do not profit by mentioning them. Baker Ross are mentioned merely to assist sourcing of materials.


Tuesday, 11 February 2020

Spoon Dollies

I don't know if you're like me, but if you're not careful, you can fall into a rut at Song Time - singing all the same old songs with very little variety, which can get a little boring. 

Basing our craft on Songs and Rhymes has helped me to choose more carefully. This week we had great fun making Spoon Dollies, so we could sing 'Miss Polly had a Dolly.'


This was our example, made by my daughter


Equipment:


  • Wooden spoons* 
  • Large cupcake paper cases
  • Ribbon of various thickness/lengths
  • Pipe cleaners
  • Wool
  • Felt Pens
  • PVA glue & glue spreaders
  • Googly eyes
  • Stickers
  • Buttons

We bought ours from Baker Ross

Preparation:

1. Cut lengths of wool in various colours (to use for hair).

2. Cut short lengths of ribbon.


Method:

1. Use PVA glue to stick on googly eyes.

2. Use felt pen to draw on nose/mouth etc.

3. Push paper cupcake case onto the end of the spoon, to form a skirt. You could add a small lump of Blu tac inside to hold in place, but we sued a blob of PVA glue.

4. Stick ribbon onto the top part of the spoon handle to form a top for the dolly. 

5. Wind a pipe cleaner around the top of the spoon handle to form arms.

6. Use PVA glue to add 'hair'. My daughter used some fake hair from our craft box, but the children at playgroup used wool, which was just as effective.

7. Embellish with buttons/stickers, then leave to dry.


*We sourced ours from Baker Ross. We are not affiliated to Baker Ross in any way. We do not profit by mentioning them. Baker Ross are mentioned merely to assist sourcing of materials.

Chinese Lanterns

Our second week of Songs and Rhymes and the aim was to introduce a new one. Well, its actually quite an old one, but new to me and certainly to the children. Quite handily, it tied in with Chinese New Year. So, the craft just had to be... 'Chinese' lanterns!!


The finished article
I can't claim any credit fro the idea, we used a printable from Twinkle, a UK based teacher's resource site. It's full of great ideas. You have to register to use it. Some ideas are available for free, but for others you have to pay a subscription fee.

Incidentally, the song we decided to use alongside this activity was called, 'My ship sailed from China.' It has some great actions, so if children don't know the words, they can always join in with the actions. If you'd like to learn them, this clip from You Tube is quite handy.


Equipment:


  • Paper cups 
  • Pipe cleaners
  • Stickers
  • Paper strips
  • PVA glue & glue spreaders
  • Scissors with sharp points

Preparation:

1. Make two small holes in the top of each cup. I used the sharp points of scissors to do this.

2. Cut thin paper strips.

Method:

1. Show children how to thread both ends of a pipe cleaner through the two holes in the top of the cup. 

2. Look inside the cup and pull both ends of the pipe cleaner towards you and twist the ends together. 

3. Pull the loop at the top of the cup. The twisted ends should prevent the pipe cleaner from coming all the way back out.

4. Embellish the lantern with stickers of your choice.

5. Spread a line of PVA glue around the inside rim of the cup. Stick one end of the paper strips to the line of glue, to make a tasseled edge to your lantern.

6. If you, can, hang to dry.


Work in progress


Thursday, 30 January 2020

Zoom, Zoom, Zoom Rocket Craft

This term, we're focusing on crafts linked to some of the songs we love to sing at coffee and snack time. One of the children's favourites. is 'Zoom, Zoom, Zoom, We're going to the Moon'. To be fair, it's one of my favourites too! 


The finished article

The craft is a simple one, that we first used for Bonfire Night, a few years ago. Now that some of our older ones have moved on, it seems the perfect time to revisit this craft.


Equipment:

  • cardboard rolls (kitchen roll tubes, cut in half)
  • coloured/shiny paper
  • card circles with cut to the centre
  • PVA glue/glue spreaders
  • stickers
  • shiny or brightly coloured paper
  • curling ribbon
  • washi tape/stickers/embellishments
  • sellotape/scissors


Preparation:

  • cut card circles
  • cut coloured paper to cover tubes
  • cut short lengths of curling ribbon
  • collect cardboard rolls

Method:


1. Cover cardboard tube with coloured paper, using PVA glue to stick. *


2. Form paper circle into a cone, use tape or glue to fix overlapping parts together.

3. Apply glue to one end of the cardboard tube. Place the glued end into the paper cone and press into place.

4. Use sticky tape to fasten short lengths of curling ribbon into the other end of the cardboard tube.

5. Embellish the sides of the rocket, using stickers and washi tape.

6. Ensure each rocket is named, before being left on the 'Home' table to dry.


Work in progress


* Alternatively, you could paint the rocket, suing a mixture of PVA and poster paint, but you may run the risk of it still being quite wet by home time and also, it might be hard to apply some embellishments, although the glue in the paint might help them stick.