Search This Blog

Showing posts with label craft. Show all posts

Tuesday, 18 January 2022

Happy New Year! Calendar Craft


Happy New Year!

We always start the new year with a calendar craft and ever since I discovered how much our Mums love a hand print of their child, to keep for posterity, its been a hand print. Sometimes (as this year) accompanied by a poem, always with the date, though, so that, years later, they can place that moment in time.

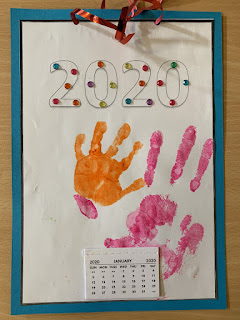
This is this year's version ('scuse the shadow, it was a busy old morning, so I had to take the pic as quickly as I could, before the moment was gone).


And if you'd like to see the blank version, it's here:

This is the version we did two years ago, just before the pandemic struck!


As you can see, each one is unique! Just as it should be!


Equipment:

  • coloured photocopy card
  • curling ribbon/scissors
  • hole punch
  • calendars
  • stapler (to attach calendars)
  • poster paint/paint trays (we use 3 or 4 colours)
  • sponges (for applying paint to hands)
  • stickers
  • wipes
  • overalls
  • pens (to label craft work)

Preparation:

1. Order calendars (before Christmas). You can get them from places like *Baker Ross and Amazon. Some local stationers may also stock them.

2. Prepare sheet for craft and photocopy onto coloured card (or onto plain paper, trim and stick onto card).

3. Hole punch holes in the top of the card for a ribbon to hang it.

4. Cut ribbon for hanging calendar.


Method:

1. Help children roll up sleeves and put on overall.

2. Show children how to apply paint to their hands (it comes out less splodgy when applied with a sponge) and then press hand on to paper.

3. Wipe hands with wet wipe. Give children option to try another colour.

4. Allow children to embellish with stickers.

5. Give children option of ribbon to hang calendar.

6. Adult to attach calendar with stapler.

7. Ensure children's name is on work, and put aside to dry, ready for Home time.


*Any resources listed purely for information purposes only.


Thursday, 2 December 2021

Christmas Tree Crowns

Christmas is upon us, once again!

Every other year, the Church holds a Christmas Tree Festival and our toddler group always enters a tree.

This year, our tree's focus is based around the concept of the potential of each baby. 

In Jesus' case he was born to be kind, albeit not an earthly one. So this year, we made clay crowns, like these:

What child can resist a bit of bling, eh?


Equipment:

  • Air drying clay* 
  • Rolling pin
  • Crown cookie cutter
  • Drinking straw
  • Paper
  • Pen (for writing names)
  • Paint brushes
  • Gold paint
  • Pot for paint
  • Glittery bits (beads, sequins, gems)
  • PVA glue
  • Glue brush
  • Glue pot
  • Newspaper
  • Overalls
  • Baby wipes
  • Scissors
  • String or ribbon for hanging

Preparation:

1. Prepare pots of paint.

2. Roll out balls of clay. You could roll these out in advance, and keep sealed, but I did this on the day, as fresh clay is more pleasurable  and easier to use. I do this for them, as clay needs to be rolled evenly, and that can be hard for children to manage. If it is too thin, it will be more fragile, once dry.

3. Roll out clay (on sheet of paper) and cut out crown shapes. Remove excess clay from around cutter, before pulling cutter away. I roll out on a sheet of paper, which may sound wasteful, but sops clay from sticking to the table and makes it easy to transfer clay work away, once it is finished.

4. Make hole for hanging. The end of a drinking straw is ideal for this. If you do it in advance, the children will work around it, if you try to do it at the end, there may not be much space! 😄


I only roll out enough for one table, at first, as I don't want the clay to dry out.


Method:

1. Child paints crown gold. Yes it is on damp clay, but they will dry together. The paint will be a little thin, but using white clay means it will be fine.

2. Child adds glittery bits, by pressing them in firmly. It does not matter where they place them, or how many they use, the end effect will still be stunning.

3. Write child's name on sheet and remove to dry. This may take a day or two, depending on where you place it. 

4. When the crown is dry, paint it with PVA, across all the crown and round the edges, but not underneath. Try to keep the ole for hanging clear of glue.

5. Leave to dry (approx. 6 hours, depending on how thick your glue is).

6. Cut string or ribbon to desired length, ready to hang your ornament.


I balanced the clay crowns on small pots, whilst painting the PVA and leaving it to dry, so the edges didn't stick to the newspaper.


The completed tree!


*Resources:

Das Clay  (we use this one - widely available Hobbycraft, The Works, W
HSmith etc.)

Giotto gold paint (also available at The Range, I think)

Crown cookie cutter

Gold string for hanging (similar in Sainsbury's)

Please note: no Ads here. Resources listed, purely to help people find similar.

Tuesday, 5 November 2019

Reduce, Reuse, Recycle

They say an army marches on its stomach and for the want of a horse shoe nail a battle was lost. Well, what playgroup runs without using some kind of junk?

In this day and age, it's also, I guess, a responsible thing, especially if there's bits and pieces that we just cannot put into local recycling schemes.


Reduce, reuse, recycle.


We use a fair amount of recycled bits and pieces and here are some of our favourite:

1. Play-doh pots

We use Play-doh every week at our playgroup. We like to put our fresh pots every so often and it's quite surprising many we get through. Once, emptied and cleaned, they make great pots for keeping lots of bits and pieces, but I love using them as glue pots, for PVA glue. If you keep the lid and put it on the top, once you've finished, and if you've  put the lid on properly, it helps keep the glue from drying out. This also helps prevent glue wastage.


2. Ready meal trays 

The black plastic trays are apparently the worst for recycling. It seems they are difficult for recycling machines to separate. in our area, the local authority won't collect them. However, at our playgroup we often use them as pots to put out bits and pieces for craft, or as trays for holding paint, for craft activities. They can be washed out and used again, if you need to.


Re-purposed ready meal trays being used for printing.


3. Plastic bottles

These can be used in all kinds of ways. Either for junk modelling or making into skittles. My use for plastic bottles, however, is for a craft - turning them into instruments.

Once decorated with stickers and or washi tape, they can be transformed.

The bottle tops can also be re-purposed in various ways - wheels on models of vehicles, for example.


4. Cardboard tubes

Who hasn't made something using a cardboard tube at some point in their lives? These days, I'd recommend using kitchen roll tubes rather than toilet rolls, as I consider them more hygienic. However, I have heard that a quick blast in the microwave can make your toilet rolls hygenic.


5. Glass jars & dessert pots

Obviously you have to be careful, when using glass around young children. Nobody needs or wants broken glass around. However, occasional use, when warranted, is also the perfect opportunity to teach little ones about handling things carefully. 

We love using little glass ramekins, bought containing desserts, as Christmas candle pots and glass jars can make great nightlight holders.


A little decoration can transform a plain glass ramekin.


6. Bubble wrap 

We use bubble wrap for printing. It can be used to great effect, when wrapped round a cardboard tube.


7. Wool

Odds and ends of wool can be used to recreate hair, as seen in this farmer craft.


8. Buttons

Embellish crafts with buttons. Sometimes they can also be used as a feature. In this Poppy craft, buttons worked well in the centre.


And in this Snowman craft, they made great buttons down his front, but black buttons could also have been used for the mouth, although in this case we used stickers.


9. Plant Pots

Whenever we have a planting activity, we like to reuse the smaller pots that you get when you buy bedding plants. A simple clean in a bucket, makes them suitable to use once more.

Plastic pots like these cannot be recycled, so why not reuse them?

Do you recycle?

I would love to know what you reuse, in your craft activities and also how you transform it!


Friday, 18 October 2019

Autumnal Leaf Wind Spinners

The idea for this craft was acquired from a group I helped with the other year, who were putting on a Light party. 
I carefully stored the idea in my head and up it popped at our Autumn Term planning meeting. 

Unusually for me, I'm posting it BEFORE we've done it, as I'll be missing from the group next week, and wanted to leave my instructions where they could easily be found!

Hey presto...


The original completed flat 'Spinner' that inspired this week's craft.

The craft is based on those snake spinners you may have made as a child. You cut out a spiral, which once decorated and opened up, looks something like this:


Hanging 'Spinner'.


Unfortunately, this one has dropped slightly. The more you stick on it, the more it will stretch and drop, so you might need to warn the parents that this could happen.

Hopefully, the cute little foam stickers that we ordered from Baker Ross*, which are smaller than the leaves in the original version, will drag our spinners down less!


Equipment:


  • Card in Autumnal hues
  • Scissors
  • Hole punch
  • Ribbon
  • Leaf stickers/shapes
  • Paint in Autumnal hues
  • Paint trays
  • Baby wipes
  • Overalls


Foam stickers are great for little fingers

Preparation:


This craft is quite prep heavy!
  • Order/buy leaf shape stickers.
  • Photocopy spinner onto light card in Autumnal hues (eg. red, orange, yellow).
  • Cut spinners out.
  • Use a hole punch to punch a hole in the end of the spinner. Or you could stick yarn on with sellotape.
  • Cut short lengths of ribbon or wool (ours is from Baker Ross*).
  • Pour poster paint in Autumnal hues into some paint trays.


Painted fingerprints add additional skill and interest.


Method:


1. Help children put on overalls.

2. Give each child a spinner with their name written on the back first. It may help to add the ribbon at this stage too!

3. Show children how to finger print paint along the spiral (great for practicing the kind of motor skills they need for tracing letters).

4. Give children a selection of Autumnal leaves to stick on their spinner. I would suggest doling these out, once they've finished their painting, to avoid running out before the end of the session.

5. Place on 'Home' table to dry. Wipe sticky fingers off with Baby wipes.


*Please note: We are not affiliated to Baker Ross. Any mention of brands is purely to aid sourcing of materials. There is no financial gain from running this blog.


Tuesday, 8 October 2019

Leaf Puppets

It's funny how some crafts are real crowd pleasers, and often it's the ones you wouldn't imagine that really spark interest, like these leaf people puppets that we made last year.


How d'you do?

This is a great craft for those who don't like too much mess.

We only provided the bare minimum of materials, but somehow these leaf creatures have a real life of their own!


Equipment


  • Photocopier card in autumnal colours (red/orange etc.)
  • Googly eyes
  • Twigs
  • Lolly sticks
  • Selloptape
  • Felt pens


Preparation

Somewhat more laborious to prepare than some of our crafts, unless you can buy pre-cut leaves online. 

  • First photocopy leaf shapes onto Autumnal coloured card and cut them out. 
  • Gather leaves and twigs.


Method

1. Children choose the leaf shape that appeals to them.

2. Help children fasten lolly stick to the back of the leaf, with selloptape.

3. Children stick on googly eyes and add limbs to their creatures, using twigs and sellotape (children will need help with sellotape).

4. Name leaf creatures on the back and place on the home table.


Tuesday, 1 October 2019

Autumn Wreath

I don't know about you, but I love seeing art 'in progress'. 

There are so many decisions to be made; over colours and composition. I love watching little ones working this out for themselves. Sometimes the art produced is not what you had in mind, but its all part of the learning process for those little brains, eyes and hands. 

This particular craft created so much opportunity for taking pictures, I couldn't help myself. I hope you enjoy them too, as I take you through this simple and effective craft. It was another one of 'those' that the parents loved straight away. It was inspired by our Holly Wreath craft from last Christmas, and was just as fun to make.


Focus on the process

Equipment:

  • Paper Plates
  • Leaves cut from light card in various autumnal hues
  • Autumn Leaf shapes (bought pre-cuts)
  • Ribbon
  • Scissors
  • Sellotape
  • Poster paint in autumnal hues
  • PVA/pots/glue spreaders
  • Paint trays
  • Paintbrushes
  • Painting Overalls/shirts
  • Wet wipes


Preparation:


1. Buy pre-cut leaves* and/or cut leaves from light card stock. We had a mix of both, to keep costs down, but you could use all card, or all bought.

2. Cut out centre of paper plates.

3. On the day, when setting up, mix poster paints with one at least third PVA, so you can stick leaves directly onto the paint. We gave the children a choice of a mustard yellow or brown, to paint onto the wreath.

4. Cut short lengths of ribbon for hanging, and stick them to the back of the cardboard circle shape, using sellotape.

5. Make an 'example' so the children can see what you're aiming for.


Easy craft for little ones


Method:

1. Make sure each child is wearing an overall and has sleeves rolled up before they start. This one is going to be messy!

2. Give each child a card circle and help them to write their name on the back (you can do this at the end, but it will be a lot more messy).

3. Show the children how to apply the paint to the card circle and then to stick leaves on to the paint.

4. As the children begin to layer leaves, they may have difficulty making some to stick, this is where the pots of glue and spreaders come in to play.

5. Once the child is finished, place the wreath to dry and clean up. At this stage it is advisable to clean the child's place before the next child comes along, otherwise their work well may stick to the table.


A completed wreath


*We got our leaves from The Works (£1 a packet). You can also buy them at The Range. We are not affiliated to these stores, but mention them purely to aid sourcing. There may be other places that also stock them.