Search This Blog

Showing posts with label playgroup. Show all posts

Thursday, 24 March 2022

Mothering Sunday

Mothering Sunday. That's what it used to be called. Now more commonly referred to as 'Mother's Day'. For the sake of Brenda (our fabulous play group tea lady), who prefers the old name, to the new, I have adapted this popular tea pot craft with a ditty that reflects the traditional name for this day.


In the UK, Mothering Sunday, is on the fourth Sunday of Lent. In the past, it was considered important for people to visit their 'Mother Church' the main church in their area. This of course, brought families together for the day, as domestic servants were allowed to return to their home church. Thus it has become associated with the idea of visiting home and taking a gift of flowers to your Mother.


Teapot worksheet


Equipment

  • coloured card
  • worksheet
  • scissors
  • single packet tea bags
  • flower stickers
  • pens 


Preparation:

1. Photocopy worksheet onto card.

2. Cut out teapot shape and round the top of the heart (enough to insert tea bag packet).


Method:

1. Children decorate teapot with stickers.

2. Help children select tea bag and insert into teapot.

3. Write child's name on the back and leave on the 'Home' table to be collected at the end.


NB Feel free to print/enlarge my image for non-commerical use. If you would prefer a more personalised teapot, with a finger print design, you might like to try this one: https://www.messylittlemonster.com/2015/04/teapot-craft-free-printable.html

Tuesday, 18 January 2022

Happy New Year! Calendar Craft


Happy New Year!

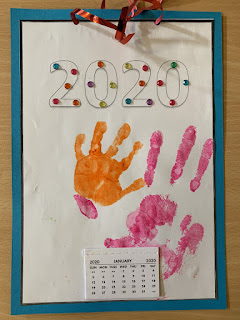
We always start the new year with a calendar craft and ever since I discovered how much our Mums love a hand print of their child, to keep for posterity, its been a hand print. Sometimes (as this year) accompanied by a poem, always with the date, though, so that, years later, they can place that moment in time.

This is this year's version ('scuse the shadow, it was a busy old morning, so I had to take the pic as quickly as I could, before the moment was gone).


And if you'd like to see the blank version, it's here:

This is the version we did two years ago, just before the pandemic struck!


As you can see, each one is unique! Just as it should be!


Equipment:

  • coloured photocopy card
  • curling ribbon/scissors
  • hole punch
  • calendars
  • stapler (to attach calendars)
  • poster paint/paint trays (we use 3 or 4 colours)
  • sponges (for applying paint to hands)
  • stickers
  • wipes
  • overalls
  • pens (to label craft work)

Preparation:

1. Order calendars (before Christmas). You can get them from places like *Baker Ross and Amazon. Some local stationers may also stock them.

2. Prepare sheet for craft and photocopy onto coloured card (or onto plain paper, trim and stick onto card).

3. Hole punch holes in the top of the card for a ribbon to hang it.

4. Cut ribbon for hanging calendar.


Method:

1. Help children roll up sleeves and put on overall.

2. Show children how to apply paint to their hands (it comes out less splodgy when applied with a sponge) and then press hand on to paper.

3. Wipe hands with wet wipe. Give children option to try another colour.

4. Allow children to embellish with stickers.

5. Give children option of ribbon to hang calendar.

6. Adult to attach calendar with stapler.

7. Ensure children's name is on work, and put aside to dry, ready for Home time.


*Any resources listed purely for information purposes only.


Sunday, 15 March 2020

Incy Wincy Spider

There can't be a playgroup in the land who has never sang Incy Wincy Spider

This Song is certainly a favourite of ours, and surely quite topical, with the the wet weather we've been having this year.

We've made various versions of Incy in the last four or five years, but I think this one is my favourite!


Each one is unique!


Equipment:


  • Play dough 
  • Googly eyes
  • Pipe cleaners
  • Paper plates/small pieces of card
  • Felt pens


Preparation:

  • Cut pipe cleaners in half and then in half again.


Method:

1. Take a small lump of play dough and roll into a ball.

2. Add two googly eyes. We provided a few different sizes, to choose from.

3. Add pipe cleaners as legs. Children may decide to add as few or as many as they like, but that is totally fine!

4. Place on paper plate/card and write name on the side, ready for home time.


* We used the Kids with Food Allergies rice flour recipe, so that it would be suitable for anyone allergic to wheat/gluten. We used black food colouring, to make the spider, but actually your spiders could be quite colourful, if you like! Play dough can be made a few days in advance but will need to be stored in the fridge in a air tight container.

Marching Drums

One of the songs our littlies love to sing at playgroup is The Grand Old Duke of York. So it seems only natural to make our own drums, with which to sing along!


Ready to march!

If you need a reminder, the words of the song can be found by following this link.


Equipment:

  • Used container with lid
  • Coloured paper circles
  • Felt pens
  • Stickers - we ordered some instrument stickers from Baker Ross*
  • PVA glue and spreaders
  • Plasticine
  • Short sticks
Not that attractive in its original state, you can see why it needed covering!

Preparation:
  • Collect suitable tubs/containers.
  • Cut coloured paper/light card circles for the top of the tub. You could also do as I did, and cut card to fit the side of the tub, or if you're feeling brave you could use poster paint mixed with PVA glue.

Method:

1. Use PVA glue to stick coloured paper on the tub, to prepare the surface for decoration.OR paint decoration using paint mixed as above.

2. Decorate coloured paper using felt pens & stickers.

3. Roll a ball of plasticine and mould it round the end of a short stick, to form a drumstick.

4. Don't forget to try them out at song time! The children are sure to enjoy marching round with their drums!


*We sourced ours from Baker Ross. We are not affiliated to Baker Ross in any way. We do not profit by mentioning them. Baker Ross are mentioned merely to assist sourcing of materials.


Tuesday, 11 February 2020

Spoon Dollies

I don't know if you're like me, but if you're not careful, you can fall into a rut at Song Time - singing all the same old songs with very little variety, which can get a little boring. 

Basing our craft on Songs and Rhymes has helped me to choose more carefully. This week we had great fun making Spoon Dollies, so we could sing 'Miss Polly had a Dolly.'


This was our example, made by my daughter


Equipment:


  • Wooden spoons* 
  • Large cupcake paper cases
  • Ribbon of various thickness/lengths
  • Pipe cleaners
  • Wool
  • Felt Pens
  • PVA glue & glue spreaders
  • Googly eyes
  • Stickers
  • Buttons

We bought ours from Baker Ross

Preparation:

1. Cut lengths of wool in various colours (to use for hair).

2. Cut short lengths of ribbon.


Method:

1. Use PVA glue to stick on googly eyes.

2. Use felt pen to draw on nose/mouth etc.

3. Push paper cupcake case onto the end of the spoon, to form a skirt. You could add a small lump of Blu tac inside to hold in place, but we sued a blob of PVA glue.

4. Stick ribbon onto the top part of the spoon handle to form a top for the dolly. 

5. Wind a pipe cleaner around the top of the spoon handle to form arms.

6. Use PVA glue to add 'hair'. My daughter used some fake hair from our craft box, but the children at playgroup used wool, which was just as effective.

7. Embellish with buttons/stickers, then leave to dry.


*We sourced ours from Baker Ross. We are not affiliated to Baker Ross in any way. We do not profit by mentioning them. Baker Ross are mentioned merely to assist sourcing of materials.

Sunday, 20 October 2019

Autumn Leaf Plaques

This craft was inspired by a jewellery workshop I participated in during the summer in which we made pendants and earrings using a form of porcelain clay. 

One of the ideas we were encouraged to try involved pressing plant materials into the clay, then colouring the impressions with under glaze paints. The pieces were later glazed and fired for us.

For the purposes of our craft, firing was not going to be a possibility, neither would painting the pieces once dry. It needed to be an all-in-one process. So we came up with the idea of using leaf stamps, to make plaques like these:


Just like the jewellery project, this craft proved extremely popular.

Leaf Plaque

We used air dry clay for our project. I would imagine that salt dough clay could also be used, but it would require a little baking.


Equipment:


  • air dry clay (we used white, but you can also buy coloured clay, although this is likely to be more expensive)
  • poster paint/plastic trays/sponges
  • leaf stamps (or you could use natural leaves)
  • rolling pins
  • paper plates or small piece of card
  • pens (to label paper plates with names)
  • cutters - ours was 10 cm diameter (optional)
  • ribbon
  • drinking straws (cut in half)
  • scissors (to cut ribbon)
  • PVA glue to act as a 'varnish' & brush to apply


We used these leaf stamps*


Preparation:


In advance:

  • order/buy clay 
  • order/buy leaf stamps (or gather leaves, you need to dry them a bit before use, but not too dry, or they will become brittle and fall apart)
  • cut ribbon into short lengths
  • cut a few drinking straws in half (these will be used to make a nice clean hole in the top of the plaques)

On the day:
  • pour poster paint onto sponges and work into the sponge, so that it isn't just a blob on top, then place in a plastic tray. I provided just two colours: yellow ochre and brown.
    Soaking the paint into the sponges helps to prevent blobby prints

  • roll lumps of clay into small balls
  • make an example, to show the children, before they begin


Here's the 'one I made earlier'


Method:


1. Help children into paint overalls.

2. Give each child a paper plate, ball of clay and a rolling pin. The paper plate will be used to roll out the clay, but also to take home the finished piece. This avoids making too much mess on the table, but also avoids lifting the clay plaque before it has dried, which could lead to the plaque becoming deformed. A small piece of card could be used as an alternative.

3. Children roll out clay. A round cutter can be used to make a distinct shape, or it can be left as a 'free' shape, which also looks quite visually appealing. Excess clay can be peeled off from around the edge, once the cutter has been pressed in firmly. 

This plaque is a 'free' shape. No cutter used. 

This plaque has been cut to shape with a round cutter.

4. Children make their designs, by pushing collected leaves or leaf stamps into the paint, then into the clay. As you can see from the illustrations, some used more than one stamp, creating various effects.


Another 'free' shape.

 5. Children press the end of the drinking straw into the top of the plaque, to make a hole for the ribbon, which may or may not need to be threaded by an adult. Some of the older children may be able to do this completely by themselves.

6. Write the child's name on the edge of the paper plate, on which the children will take their leaf plaques home to dry.

7. Place the paper plates on the 'home' table, until the end of the session, then use baby wipes to clean up. It is important to be thorough when cleaning up clay, as tiny dry clay particles aren't great for you, when breathed in.

8. If parents and children are returning the next week, you may wish to provide PVA to 'varnish' over the clay, or to quickly varnish them yourself, for them to pick up the following week, although this is not entirely necessary.


*We sourced ours from Baker Ross. We are not affiliated to Baker Ross in any way. We do not profit by mentioning them. Baker Ross are mentioned merely to assist sourcing of materials.


Friday, 18 October 2019

Autumnal Leaf Wind Spinners

The idea for this craft was acquired from a group I helped with the other year, who were putting on a Light party. 
I carefully stored the idea in my head and up it popped at our Autumn Term planning meeting. 

Unusually for me, I'm posting it BEFORE we've done it, as I'll be missing from the group next week, and wanted to leave my instructions where they could easily be found!

Hey presto...


The original completed flat 'Spinner' that inspired this week's craft.

The craft is based on those snake spinners you may have made as a child. You cut out a spiral, which once decorated and opened up, looks something like this:


Hanging 'Spinner'.


Unfortunately, this one has dropped slightly. The more you stick on it, the more it will stretch and drop, so you might need to warn the parents that this could happen.

Hopefully, the cute little foam stickers that we ordered from Baker Ross*, which are smaller than the leaves in the original version, will drag our spinners down less!


Equipment:


  • Card in Autumnal hues
  • Scissors
  • Hole punch
  • Ribbon
  • Leaf stickers/shapes
  • Paint in Autumnal hues
  • Paint trays
  • Baby wipes
  • Overalls


Foam stickers are great for little fingers

Preparation:


This craft is quite prep heavy!
  • Order/buy leaf shape stickers.
  • Photocopy spinner onto light card in Autumnal hues (eg. red, orange, yellow).
  • Cut spinners out.
  • Use a hole punch to punch a hole in the end of the spinner. Or you could stick yarn on with sellotape.
  • Cut short lengths of ribbon or wool (ours is from Baker Ross*).
  • Pour poster paint in Autumnal hues into some paint trays.


Painted fingerprints add additional skill and interest.


Method:


1. Help children put on overalls.

2. Give each child a spinner with their name written on the back first. It may help to add the ribbon at this stage too!

3. Show children how to finger print paint along the spiral (great for practicing the kind of motor skills they need for tracing letters).

4. Give children a selection of Autumnal leaves to stick on their spinner. I would suggest doling these out, once they've finished their painting, to avoid running out before the end of the session.

5. Place on 'Home' table to dry. Wipe sticky fingers off with Baby wipes.


*Please note: We are not affiliated to Baker Ross. Any mention of brands is purely to aid sourcing of materials. There is no financial gain from running this blog.


Friday, 27 September 2019

Muffin Case Poppies

Its coming up to that time of year again, where we remember those who gave their lives in the ultimate sacrifice. 

Its a humbling time for those of us who understand the momentous weight of it all, when we consider the price that they paid. I often wonder whether of faced with the same situation again, if we would find it within ourselves to play our part. 


Obviously, working with toddlers, we know that much of this is beyond their little worlds, so in toddler group, for now, we just concentrate on the scarlet of the poppy that is the symbol of our Remembrance.


This poppy craft doesn't allow much for individuality, but they were easy and proved a popular craft when we made them last year. Lets' put it this way; none were left behind!!


Poppy craft

Equipment:

  • Red Muffin cases
  • Black buttons or large black sequins (we preferred buttons, because they were easier to handle. Bigger buttons are the best.
  • PVA glue/glue pots/glue spreaders
  • Green lolly sticks
  • Felt pen (for writing names on sticks)
  • Overalls
  • Baby wipes


Preparation:

  • Order red muffin paper cases and green lolly sticks (we ordered ours from Amazon). This may need to be done some time in advance, in order to ensure it arrives in time.
  • Source/gather black buttons (we bought a selection from Hobbycraft and teased out the black ones.


Method:


1. Show the children how to place a blob PVA glue on one end of their green lolly stick, and place their red muffin case over the top.

2. Show the children how to place another blob of PVA glue in the centre of the red muffin case, and place their black buttons over the glue. Some children used more than one.

3. Write the children's names on their lolly sticks and place on the home table.


Please note: any links to or mentions of specific materials are purely to aid sourcing, no earnings are made via these links.

Monday, 25 March 2019

Sheep Craft 2

I've made some form of sheep craft with little ones, almost every year. This year, we decided to opt for printing our sheep, in order to give the children a chance to try something different. As we have some children for several years in a row, before they go to school, we can't do the same thing year on year for everything, although we do repeat some ideas that work really well.

We first saw the idea on Pinterest and liked it a lot, but the version we saw still involved cutting out lots of heads and legs, which we weren't too keen on! So we decided to modify the idea by drawing a sheep outline, head and legs legs onto a sheet of A4 paper, then photocopy it onto light green card.


The only drawback, to this idea is that it does limit the children's creativity a little bit. Some children like to apply multiple legs and eyes to their creations! 

However, at our group we try to achieve a balance some crafts allow for more creativity than others. This is in the hope that mums who like their children's work to look recognizable, or who don't like too much mess, will be drawn into the craft. Once drawn in, they are more likely to participate again.


A photocopied sheet certainly saves on preparation time!!

Equipment:

  • Photocopied sheet with sheep outline
  • Large corks (champagne bottles seem to have the best)
  • White poster paint
  • Googly eyes
  • Paper plates (easy palettes)
  • Painting overalls
  • Baby wipes

Preparation:
  • Collect some corks! Big corks are best. We managed to blag some big champagne corks off someone. They work great for tiny hands. 
  • Draw sheep outline on A4 paper and photocopy onto card - card holds poster paint better than paper. We used a pale green card to give the sheep a background.

Method:

1. Roll up sleeves and put on overalls.

2. Show children how to apply paint to corks and how to print with them. 

3. Children apply googly eyes to their sheep.

4. Sheep can be left to dry on the home table.

5. Children can now be cleaned up!


Addendum:

When we have a 'messy' craft, we aim to clear some mess as we go, in order to keep the table looking inviting for those who have yet had a go.


Wednesday, 16 January 2019

Sunflower Pots

Hopefully it won't be too long before Spring arrives, and with it, the thrill of watching plants blossom and grow. Every year we try to plant something with our little ones, and this year we'll be returning to planting sunflowers.

It's not exactly a craft activity as such, but such great fun and so educational too! To extend the fun, we like to turn it into a little competition - who can grow the tallest sunflower!


Equipment


  • small plant pots or large paper cups
  • compost
  • sunflower seeds (giant sunflowers have bigger seeds and are easier for small fingers to handle)
  • stickers
  • lollipop sticks/pens (to make name labels)
  • washing up bowl/water/soap & towel
  • list of growing instructions
  • certificates (to be awarded in a few months time)


Preparation

Don't forget to buy those seeds and compost!


Method:

1. Show children how to fill pots with compost, poke a hole in the soil & plant their seed.

2. Children decorate pot with stickers. 

3. Give each child a lolly pop stick with their name to poke into the soil, beside their seed. We allow a couple of seeds per child, just in case one doesn't grow.

4. Now give those little hands a scrub once they're done, in the bowl of water.

5. Send each family home with a set of instructions. Hopefully, once the plants are growing well, they'll be able to plant them out into a garden.

6. Ask parents to take a picture of their child with their sunflower in the final week of the competition, and measure it. Pictures can be emailed to the group's secretary, to judge the tallest!

7. Don't forget to give a certificate to all the entrants and a little prize to the winner.


Sheep craft

Every so often, our theme seems to require a sheep craft somewhere along the line! A year or so ago, we made this one! 

What we were aiming for...


Looking at it, you may well wonder whether we just ended up with a whole load of identikit sheep, BUT...
true to form, the children's versions did not reflect our original idea! HOWEVER that's the beauty of it. AND along the way the children have been handling different materials and refining their fine motor skills, so it's all good!


I love the individuality of each sheep! Especially the red-nosed one! 


Equipment:


  • Paper plates
  • Pre-cut legs & heads (from black card)
  • Cotton wool balls
  • PVA glue/spreaders/pots
  • Googly eyes
  • Babywipes

Preparation:

1. Cut our head and legs - there's no getting 'round this one, but it's not so bad, when you're watching a TV programme, to have something to do at the same time.

2. Make an example for the children and Mums.


Method:

1. First write child's name on the back of the plate - it's not so easy to do this, once you have glue and cotton wool all over the other side.

2. Getting down to making the sheep, the trick is to glue the head on first!

3. Then, spread the glue over a bit of the plate, stick on some cotton wool balls, before it dries and then do a bit more, until the plate is covered.

4. Add googly eyes and legs.

5. Leave to dry on the home table.


Monday, 14 January 2019

Paper Cup Penguins

Another fun Winter craft for little ones involves penguins! There's something so attractive about these little creatures that really appeal!

Making these gives me the perfect opportunity to reprise 'Have you ever seen a Penguin come to Tea?'* during our singing session. If you haven't sung it before, it's great fun... but I did get some funny looks from the parents first time around!

This craft doesn't give quite so much room for individual creativity, but somehow, our crafty little things manage to make them all their own!


Equipment:

  • Black plastic/paper cups
  • White paper circles
  • Orange triangles (for beaks) & feet cut from card/foam
  • Googly eyes
  • PVA glue/spreaders/pots
  • Baby wipes
  • Pens (for adding names)

Preparation:

1. Source your cups! I think we found these in Tesco. They were the large ones. If you can't find these, you may need to purchase white paper cups and paint them black, but this adds an extra layer to the craft.

2. Cut circles from white paper/card.

3. Cut triangles for beaks and feet for the penguins. This requires a little bit of time. See if you can find an enthusiastic volunteer, who doesn't mind cutting out whilst watching TV in the evening.

4. Make a sample, for the children to see.


Method:

1. Stick a white circle on to the cup, using PVA glue.

2. Add googly eyes, beaks and feet.

3. Add child's name to the bottom of a foot, or inside the cup, using a permanent marker.

4. Leave to dry on the Home table.


*  Click the song title for a demo of the song: Have you ever seen a penguin come to tea?


Please note: any links to or mentions of specific materials are purely to aid sourcing, no earnings are made via these links.